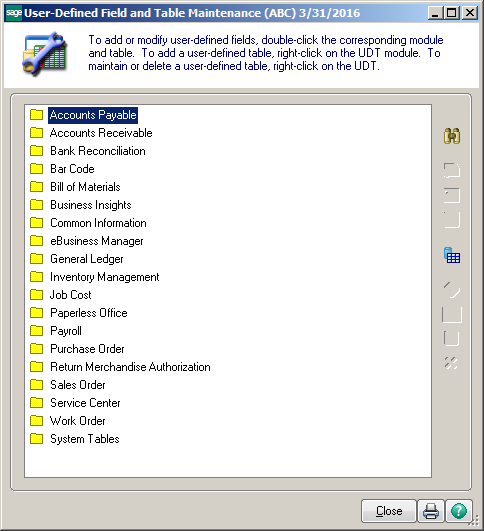
User-defined fields (UDF) are custom fields that can be added to almost any table in Sage 100. These UDF’s can be very useful when you want to track data that falls outside of the standard Sage 100 data fields. UDF’s can also be used for reports or to simplify searching for certain records. Let’s look at how to add a UDF and some of the options available to us.


Before adding a new UDF we will need to know what table to add it to as well as make sure all users are out of the system so Sage 100 can update the table. Once all users are logged out go to Modules – Custom Office – Main – User-Defined Field and Table Maintenance.
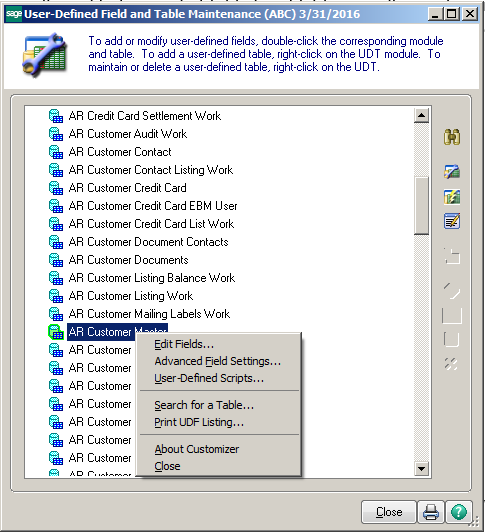
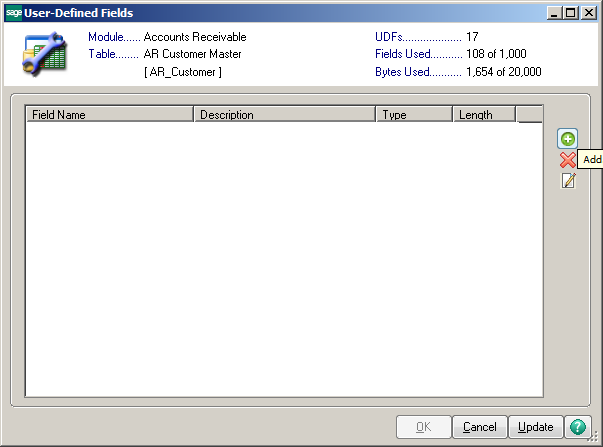
Choose which Module the UDF will be added to and then the Table. In our example, we will add a new UDF to the Customer Master table so we can track their delivery frequency. Right-click on the Table Name and choose Edit Fields. Click on the green plus sign to Add a new field.
Type the Field Name (Sage will automatically add the UDF and underscores) and the Description will automatically populate.

Manual Entry is used for any field that will manually be updated through an entry screen or by using Visual Integrator. Business Object is populated by the system and are typically used when moving data from one table to another, more information on that further down. In our example, Manual Entry will be used.
Now we can define the Control Type, Attributes, Validation, and Data Sources.

Select a Control Type. The control type determines the type of control used to enter data for the user-defined field (UDF). The control type cannot be changed after data is entered for the UDF; however, you can delete and redefine the UDF (all data associated with the UDF will be deleted).
Select a Data Type. The data type determines the type of data that can be stored in a user-defined field (UDF).
The data type cannot be changed after data is entered for the UDF; however, you can delete and redefine the UDF (all data associated with the UDF will be deleted).
Type the Maximum Length field value. The maximum length specifies the maximum number of characters allowed for the user-defined field (UDF).
The total number of characters for all UDFs for an entity cannot exceed 20,000. The maximum length cannot be reduced after data is entered for the UDF; however, you can delete and redefine the UDF (all data associated with the UDF will be deleted).
Uppercase – Select this check box to automatically convert data entered at a multi-line user-defined field to uppercase characters. Clear this check box if you do not want to automatically convert the data to uppercase characters.
Fixed Font – Select this check box to use a fixed-width font in place of the standard variable font. Clear this check box if you do not want to use a fixed-width font.
Center Text – Select this check box to center text in a multi-line control. Clear this check box if you do not want to center the text.
Right-Justify – Select this check box to right-justify text in a multi-line control. Clear this check box if you do not want to right-justify the text.
Borderless – Select this check box to display a multi-line control without a border. Clear this check box if you do not want to display the multi-line control without a border.
Mask – Select this check box to use a mask, and type the mask for the user-defined field (UDF). The mask controls how data appears in a window, as well as the way the data is entered. Masks can also control the type of characters allowed. You can specify string masks for string data type fields, and numeric masks for numeric data type fields. Clear this check box if you do not want to use a mask.
On the Validation tab, you can leave this set to None, Range, List or link it to a User-Defines Table.
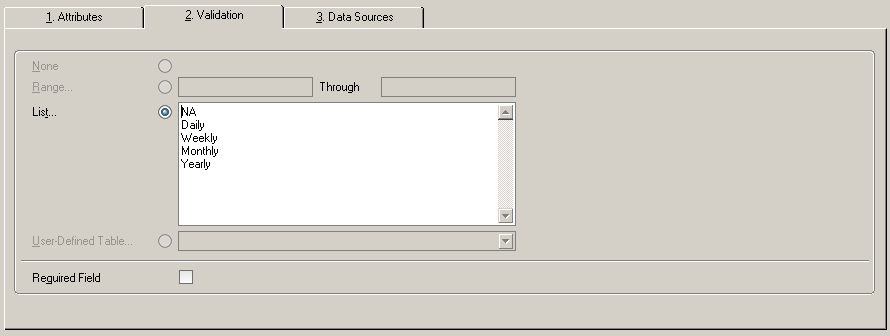
In our example, we will provide a predefined list.
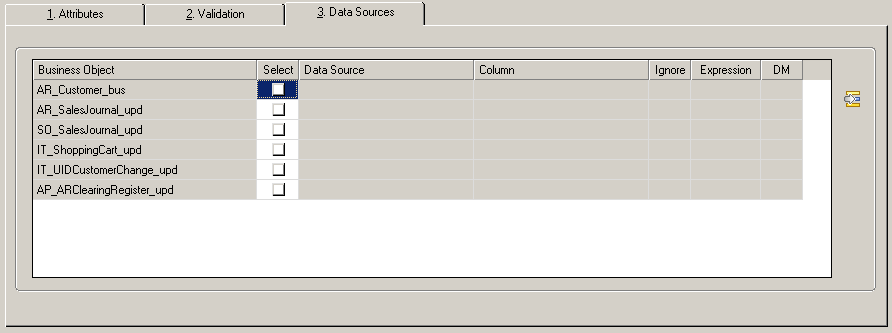
Data Sources can be used when data is to be populated from another table during an update process.
Once complete click OK and then OK on the User-Defined Table window. This will begin the process of updating the table. If anyone is using any tables or programs that need to be updated this will provide you with a warning to retry when they have exited the system.
Moving User Defined Field from Entry to History – Using Business Object
In some cases, we may need to add a UDF to table that we can only manually enter using an entry screen like Invoice Data Entry or Sales Order Data Entry but need to data to move with the record into the history tables. To do this we need to create the UDF in several locations and use the Business Object to transfer the UDF with the records.
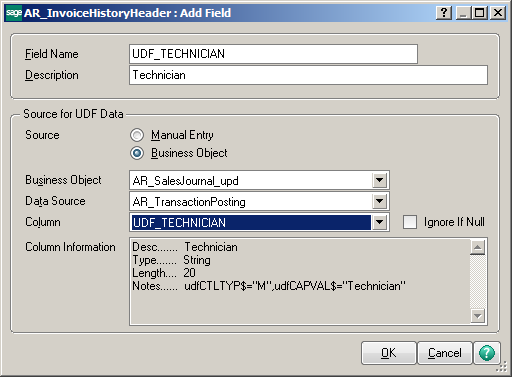
For example, let’s say we added a UDF called “Technician” to the AR_InvoiceHeader table so we could manually enter the technician’s name who performed the work for the customer. We will be able to do this in AR Invoice Data Entry but we need that data to transfer to the AR_InvoiceHistoryHeader table when we run the Sales Journal.
First, we add the UDF Technician to the AR_InvoiceHeader table as shown above using Manual Entry Multi-Line String with 20 as a Maximum Length.
Second, we have to add the UDF_TECHNICIAN to the AR_TransactionPosting table using the Business Object as shown below.
![]()
Lastly, we add the UDF to the AR_InvoiceHistoryHeader table using the Business Object as shown below.
Using User Defined Fields
Now that we have added out UDF’s we can add them to the entry screens using Customizer (as shown in Custom Screens in Sage 100 (Formerly MAS90 & MAS200) or to any Crystal Report. We can also use the field in any lookup using the Custom lookup option.
Still having trouble? ACC is proud to offer comprehensive training in Sage 100 and Sage 100c software!
Register now for our upcoming Summer Series, a series of digital “lunch & learn” webinars to help you get the most out of your Sage 100 system!

Solutions by Industry
What's New

7 Practical Ways AI Can Improve Your Business with Acumatica
Read MoreSubmitted by Courtney Quinn on Fri, 07/24/26 - 11:28
Growing Beyond Your Accounting Software: Is It Time to Consider an ERP?
Read MoreSubmitted by Courtney Quinn on Thu, 07/16/26 - 14:52

AI in ERP: Turning Business Data into Better Decisions
Read MoreSubmitted by Courtney Quinn on Tue, 07/07/26 - 14:44
Whatever Your ERP Needs, We Have the Solution!
Or call us for a free consultation 866-379-3799