In a previous blog we talked about How to Create User Defined Fields (UDF’s) which are only useful if you have the ability to update those new custom fields. Custom Screens are not just for adding UDF’s but can also be used to simplify an entry screen or organize a screen in a more efficient manner.


Accessing the Customizer
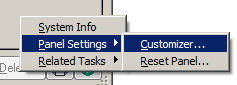
There are a few different ways to access a custom screen, first we can just open the screen we want to customize and press“Ctrl” + “F9”. We can also Right Click anywhere in the panel and choose Panel Settings – Customer.
To access all custom screens go to Modules – Custom Office – Main – Customizer Selection, and choose which custom panel you want to access.
Customizer Access
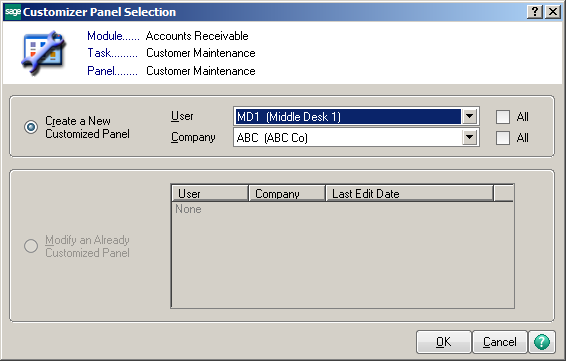
Before we can view and edit a custom panel we have to create a new panel or choose which panel we want to access. We can either set a panel by user and company, or choose all user or all companies. We can also set a Group to set a panel for multiple users (to do this go to user maintenance and set a user Group, which then becomes available in this User selection list).
These options allow us to create custom panels for different users or user functions and companies. We can control access to certain data fields by using this function or restrict certain users from seeing data all together. This also allows us to create a very simple entry panel for a basic user.
Customizer
The following screen shows us all of our tools available to us when editing a custom panel.
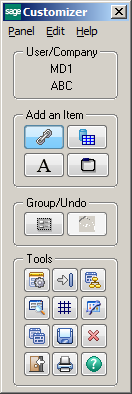
The top section shows us what user and company we are currently working on.
The second Ann and Item section allows provides the following tools. (From top to right)
Group/Undo
Adding a UDF
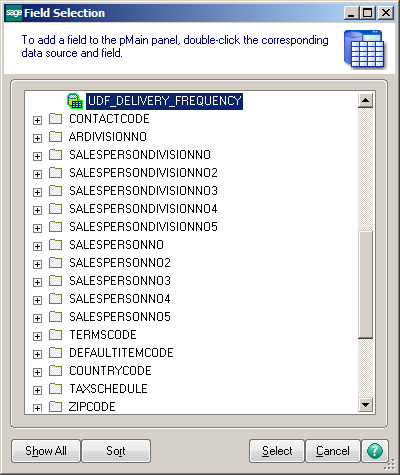
Let’s add a UDF to our Accounts Receivable Customer screen. In a previous post we created a UDF for Delivery Frequency, this is to be used for how often the customer would like deliveries. Let’s add that to the Main tab under Customer Maintenance.
Access the Custom Panel and click on the Add and Item icon for Add Field and on the panel drag the location and general size of where you want the field to go. A window will pop up allowing us to choose the UDF we want to add here.
Now we can move the UDF and description text to the exact location and position we want.
![]()
We can double click on the text to edit the verbiage, font, color and size. We also have some edit options if we click on the UDF.
Once complete we can Save and Close the Custom Panel.
You can also add standard Sage fields from other tables by using the Show All option when selecting the field to add.
Cleaning Up an Entry Screen
In our next example let’s remove some fields we don’t use and make the entry screen easier for the end user.
Access the Custom Panel and double click on the field you want to remove. Click on the Options tab and check off Hidden.

This will only hide it to the end user but it will still show in the Customizer Screen. If you are trying to utilize that space on the panel you may want to delete the text and move the field to another location. You cannot delete or remove Sage’s standard fields.
Other Useful Tips
Here are some other use cases for the customizer to give you some ideas on what you can do.
Still having trouble? We are proud to offer a variety of convenient training options.
Register now for our upcoming Summer Series, a series of digital “lunch & learn” webinars to help you get the most out of your Sage 100 system!

Solutions by Industry
What's New

7 Practical Ways AI Can Improve Your Business with Acumatica
Read MoreSubmitted by Courtney Quinn on Fri, 07/24/26 - 11:28
Growing Beyond Your Accounting Software: Is It Time to Consider an ERP?
Read MoreSubmitted by Courtney Quinn on Thu, 07/16/26 - 14:52

AI in ERP: Turning Business Data into Better Decisions
Read MoreSubmitted by Courtney Quinn on Tue, 07/07/26 - 14:44
Whatever Your ERP Needs, We Have the Solution!
Or call us for a free consultation 866-379-3799